Overview
This guide provides information on how to:
Set up Beyond Identity as a passwordless authentication solution for your Auth0 Workforce environment.
Set up Auth0 to use Beyond Identity as an Identity Provider (Enterprise Connection).
Prerequisites
Ensure that you have an Auth0 account with admin privileges.
Beyond Identity Configuration
Information to provide to the Beyond Identity Field Team:
Your Company Name | |
Your Auth0 tenant URL or configured custom domain. e.g. https://[your-domain].auth0.com The best way to find your full tenant URL is under Applications > click into any application > under Settings copy the ‘Domain’ field. | |
Beyond Identity Admin Portal Application credentials SSO Client Id SSO Client Secret | |
Beyond Identity User Portal Application credentials SSO Client Id SSO Client Secret | This will be updated by customer directly in Beyond Identity Admin UI. |
(Optional) A logo for your corporation Logo requirements: 300 x 150 pixels or less File size of 10kb or less File types accepted: SVG, PNG, JPG, or GIF |
Information you will receive from the Beyond Identity Field Team:
Beyond Identity IdP endpoint URLs: Issuer Authorization endpoint Token endpoint JWKS endpoint | https://auth.byndid.com/v2/authorize https://auth.byndid.com/v2/token |
(For Enterprise OIDC) Client ID | [From Beyond Identity Console] |
(For Enterprise OIDC) Client Secret | [From Beyond Identity Console] |
Beyond Identity Org ID | [From Beyond Identity SE] |
Event Hook API Bearer Token | [From Beyond Identity SE] |
SCIM API endpoint |
Auth0 Configuration
To configure Beyond Identity as the IdP in Auth0, follow the steps below. Once these steps are taken, you will be ready to enable Beyond Identity for test users.
Step 1: Setup Beyond Identity Admin Application in Auth0
Navigate to Applications > Applications > then click Create Application.

Name the application “Beyond Identity Admin Portal” then choose Regular Web Application and click Save.
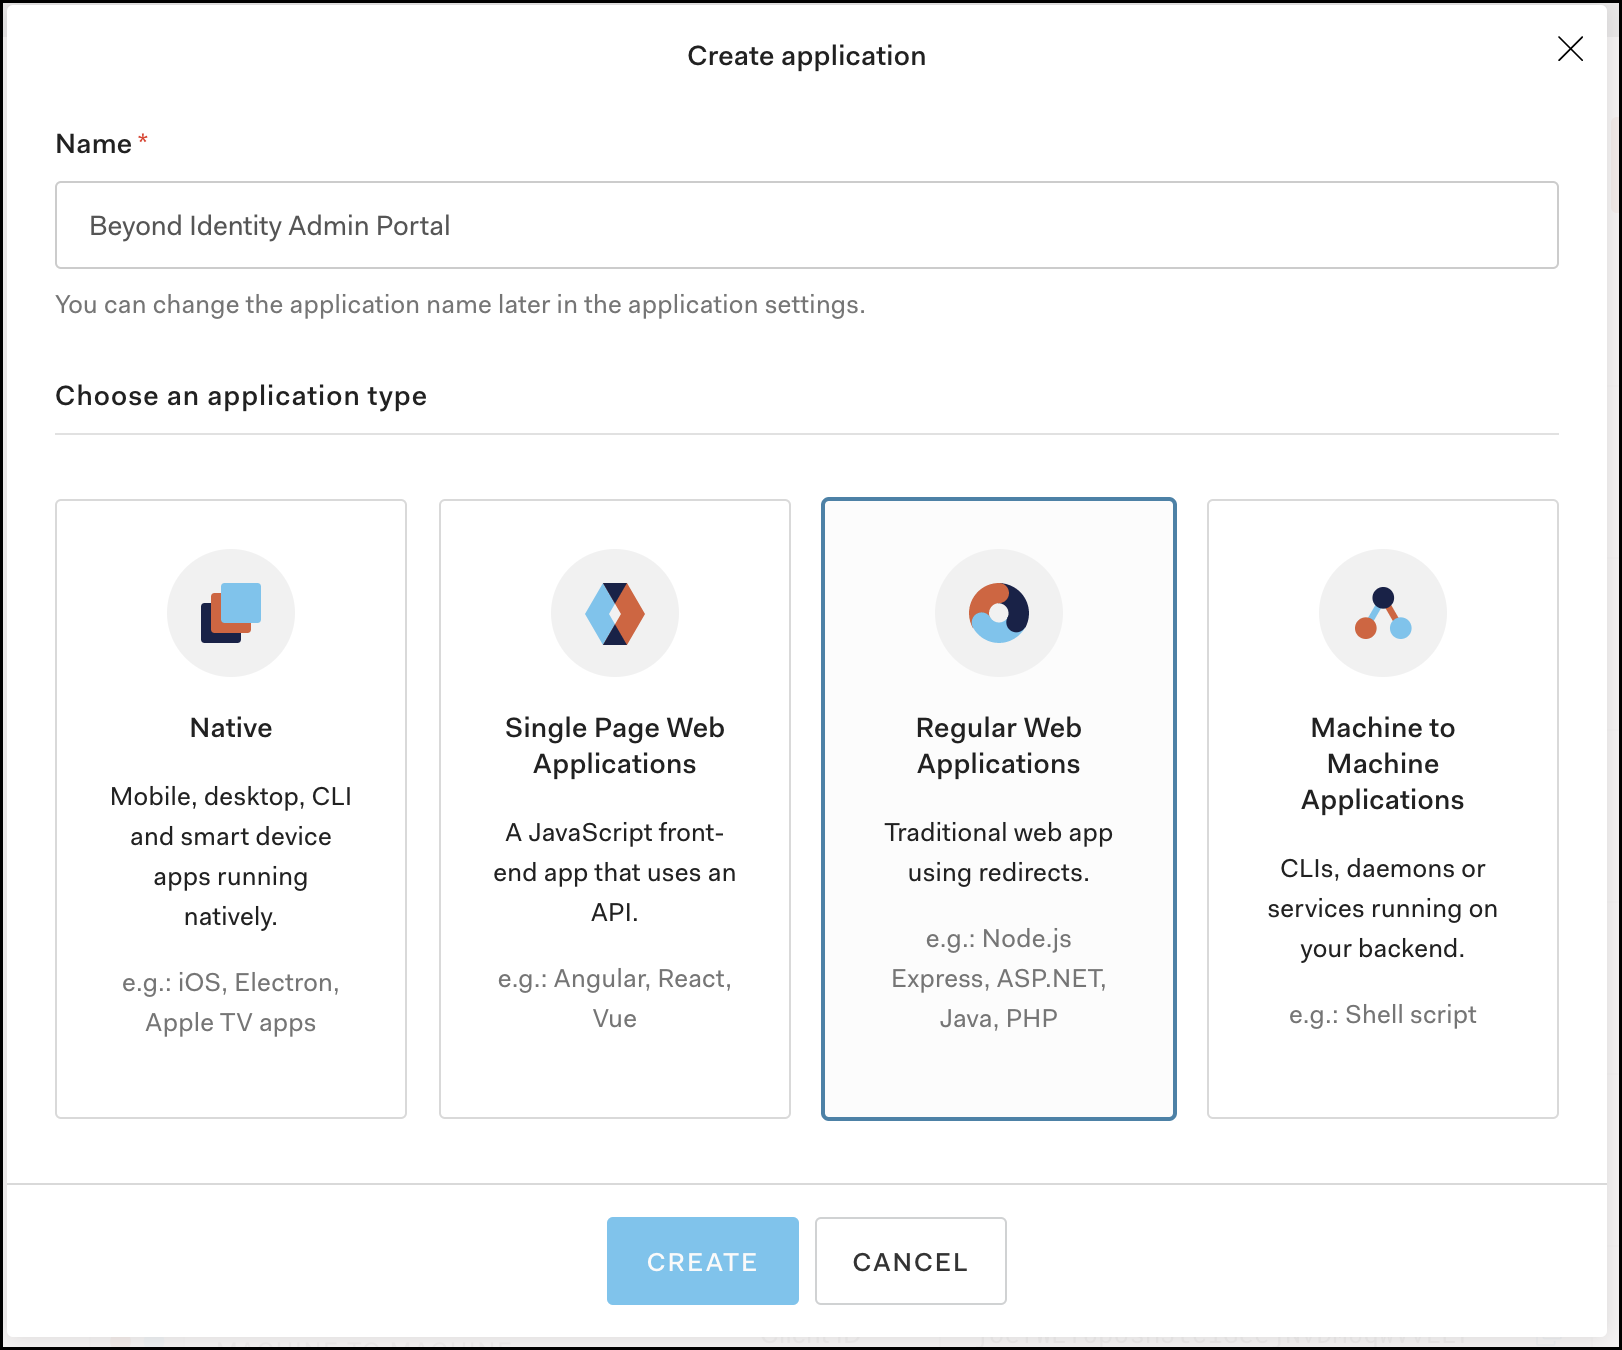
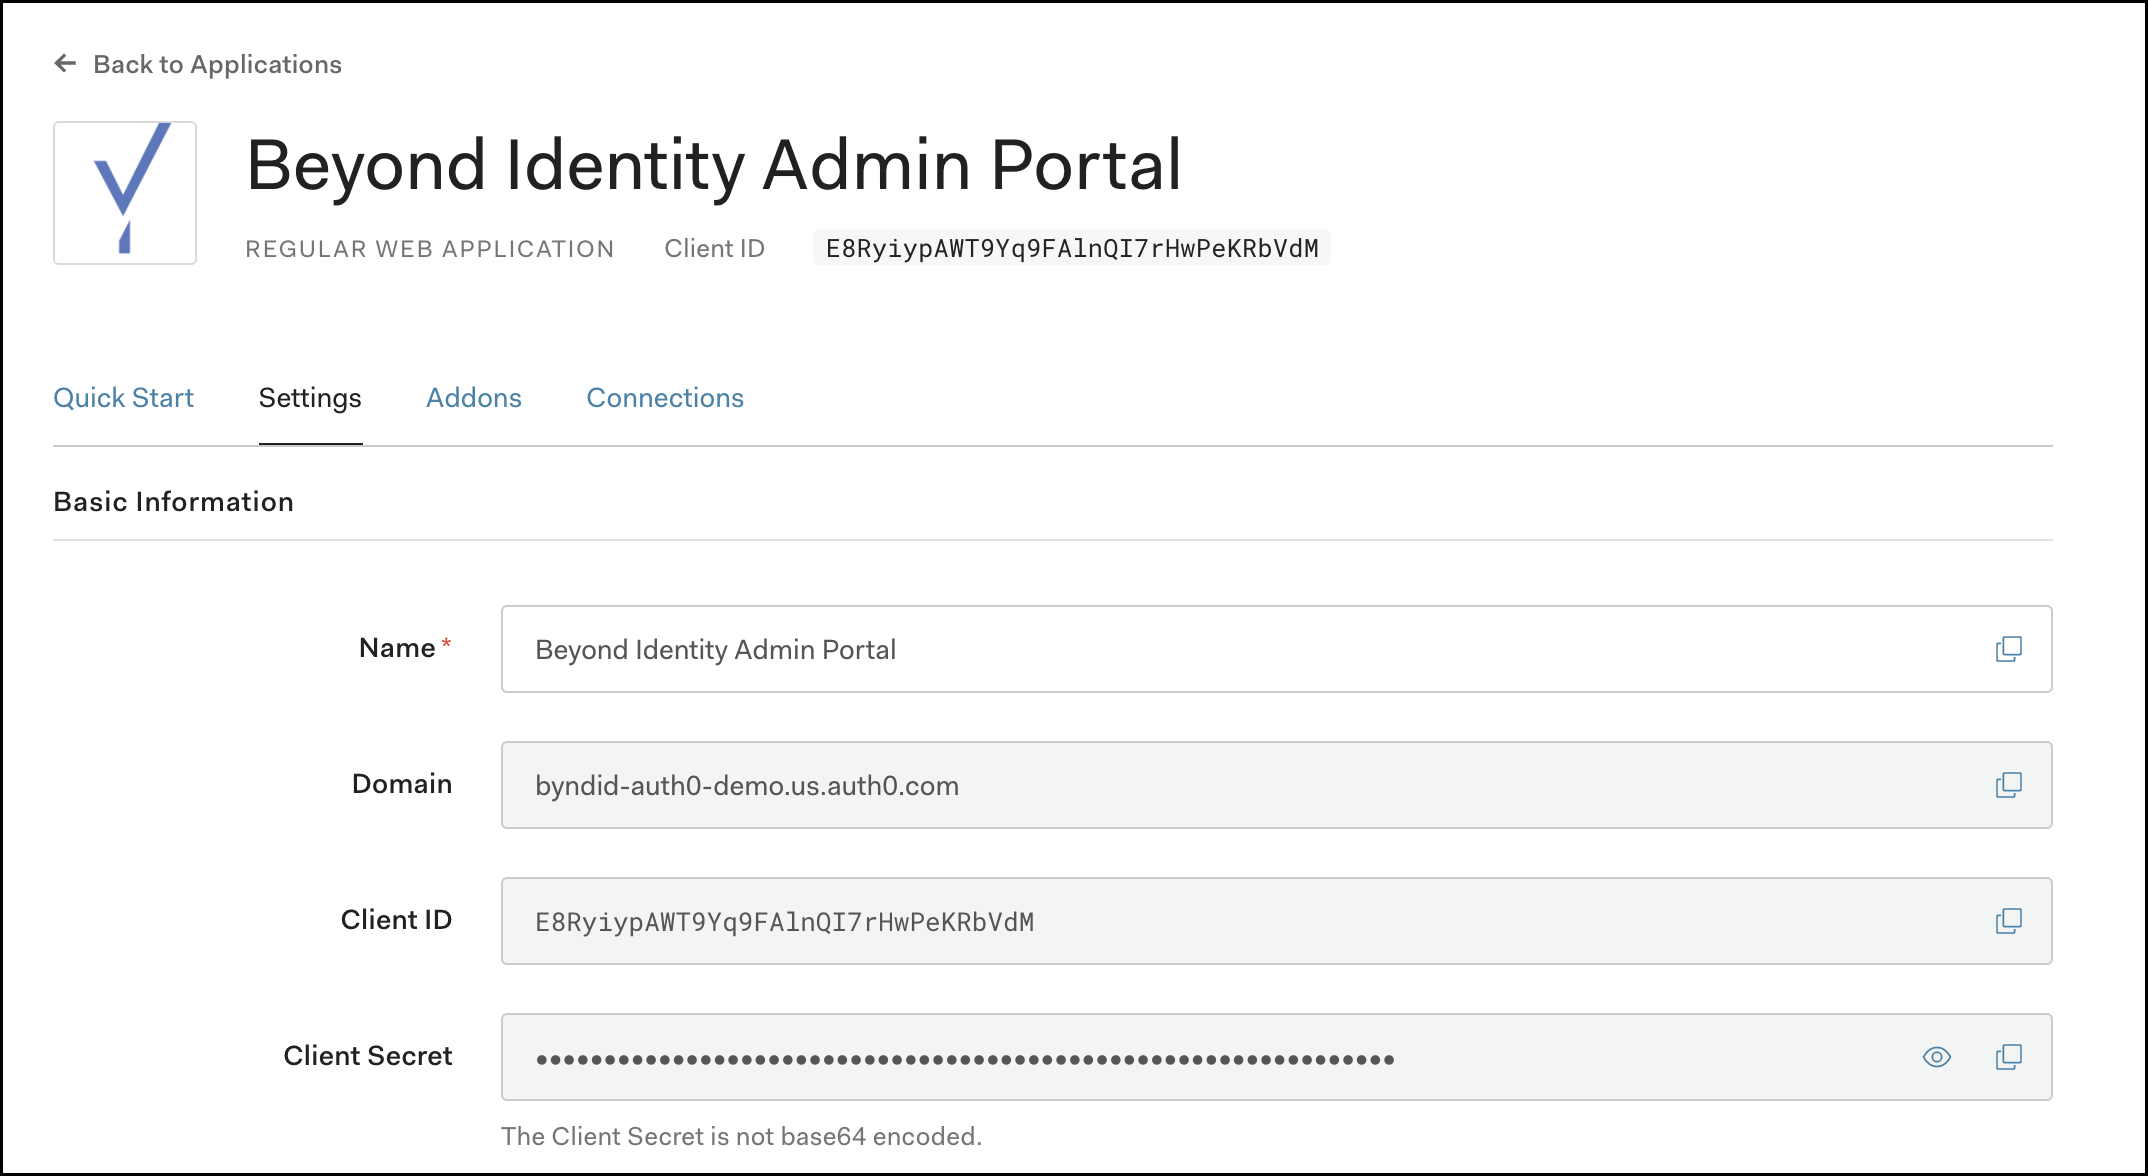
In the Settings, tab scroll down and record the Domain for your tenant and also record the Client ID and Client Secret assigned to Application. The Beyond Identity team will collect and use those values to configure access into the Beyond Identity Admin Portal.
Optional Step - Add the Beyond Identity logo to the Application Logo field. You can obtain the logo by clicking the URL below:
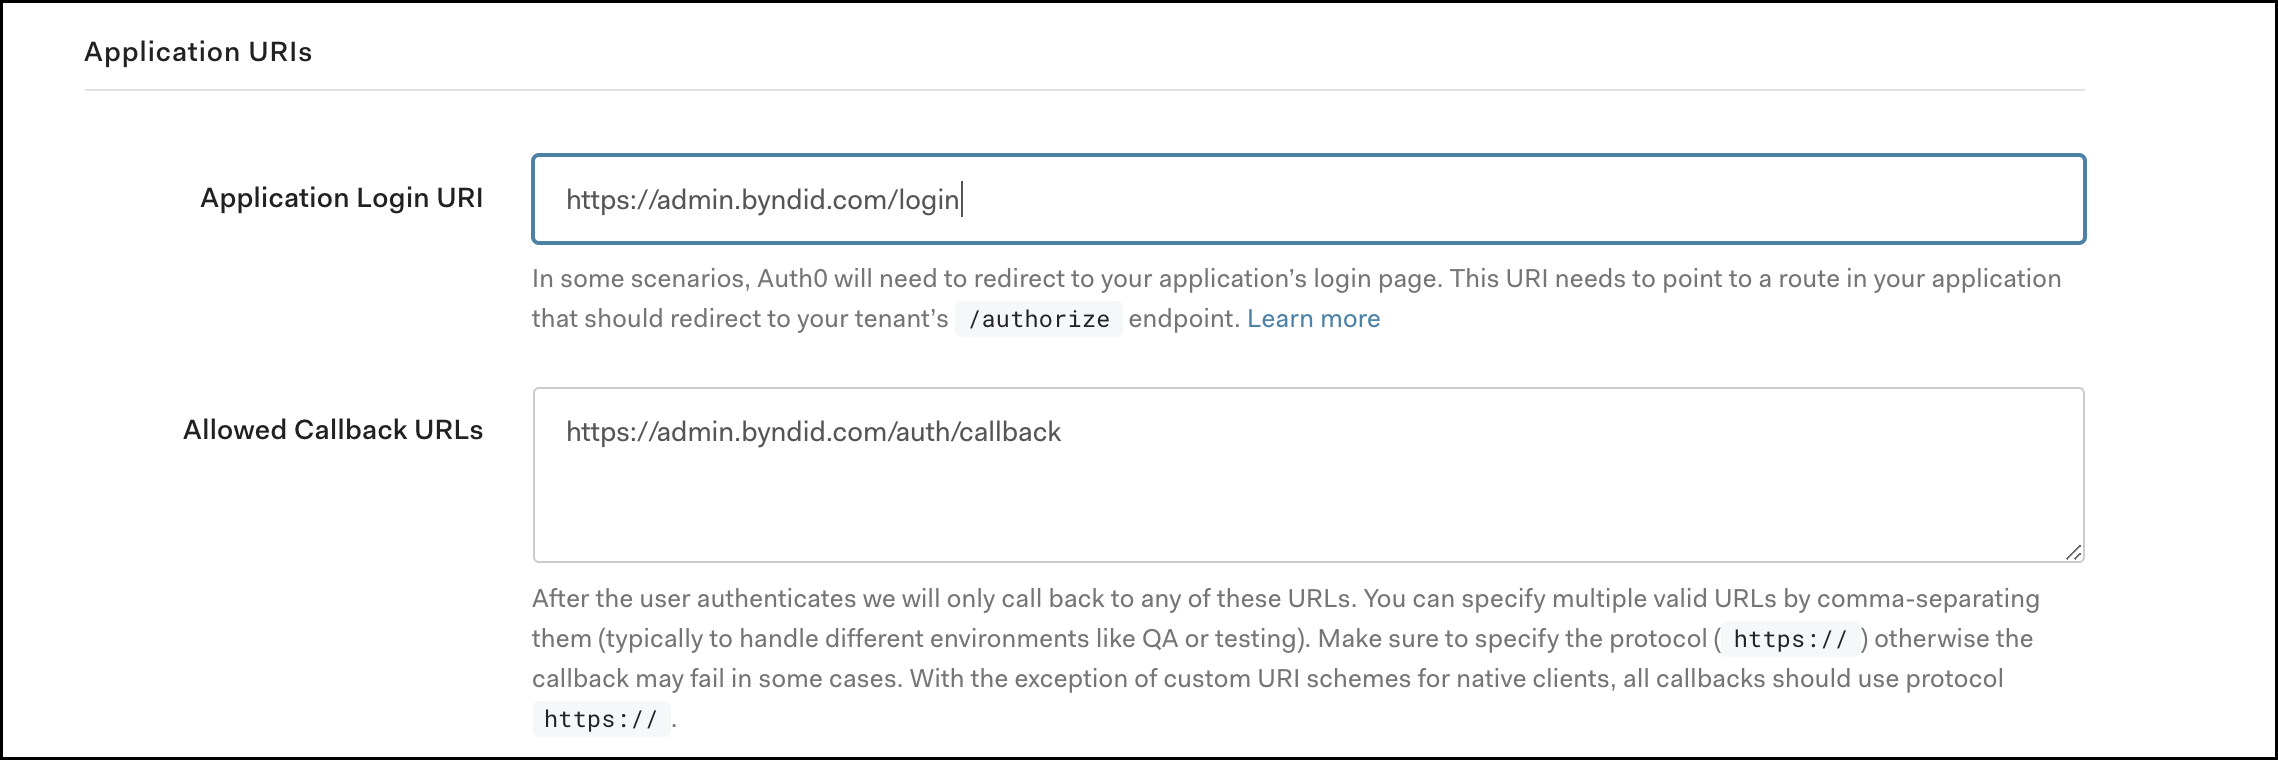
Scroll down again to the Application URIs section and enter the following values:
Application Login URI: https://admin.byndid.com/login
Allowed Callback URLs: https://admin.byndid.com/auth/callback
Scroll down and click Save Changes - all the other settings should be left as default.
Step 2: Setup Admin Portal Access
1. Provide Client ID and Client Secret assigned to Admin Application in Auth0 (as per Step 1) to Beyond Identity SE. Beyond Identity team will collect and configure those values at the backend.
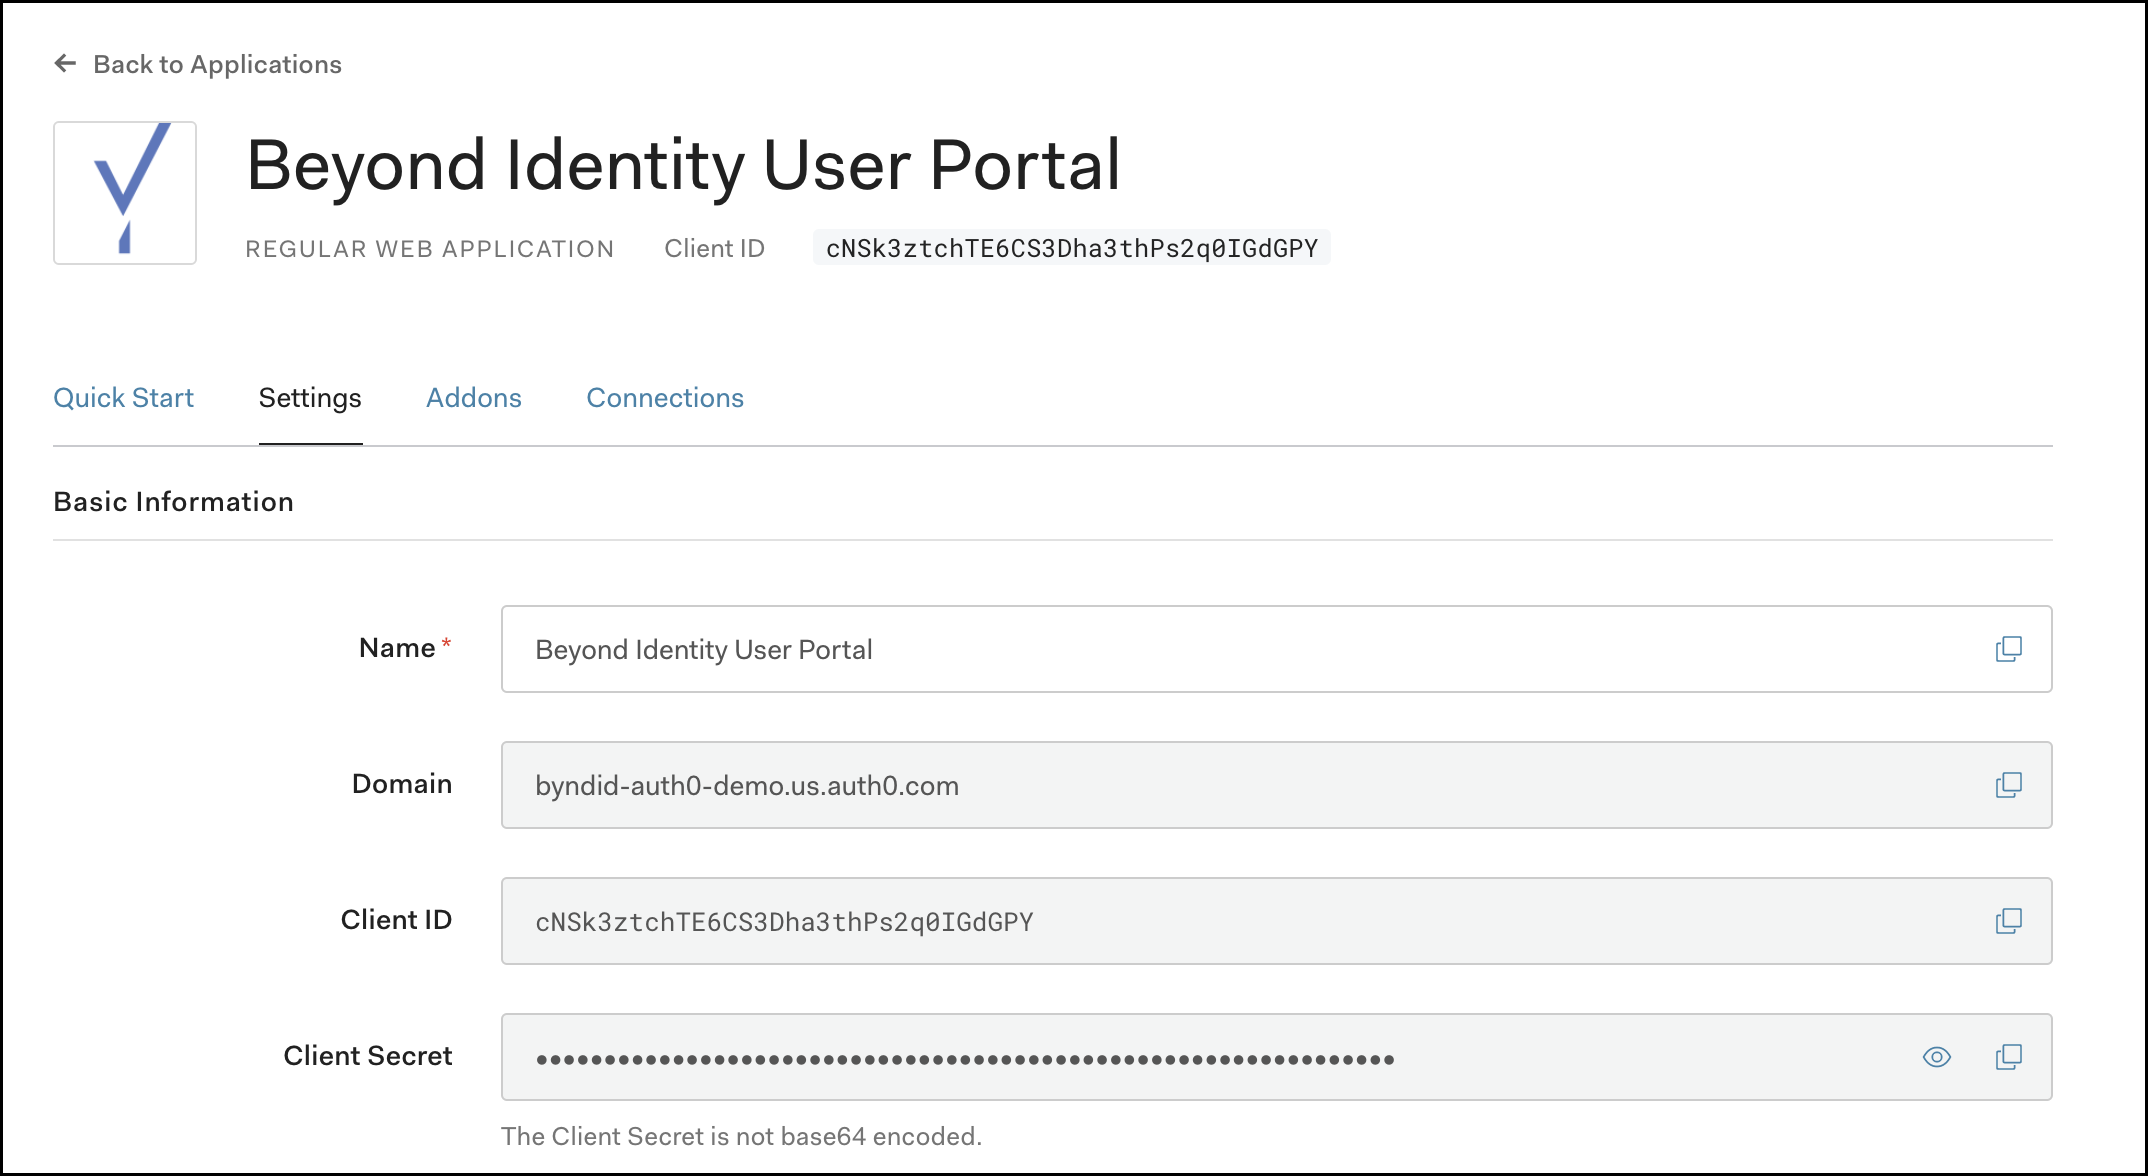
Step 3: Setup Beyond Identity User Portal Application in Auth0
Prerequisites: A Beyond Identity tenant name which will be provided by your Beyond Identity sales engineer.
Navigate to Applications > Applications > then click Create Application.

Name the application “Beyond Identity User Portal” then choose Regular Web Application and click Save.
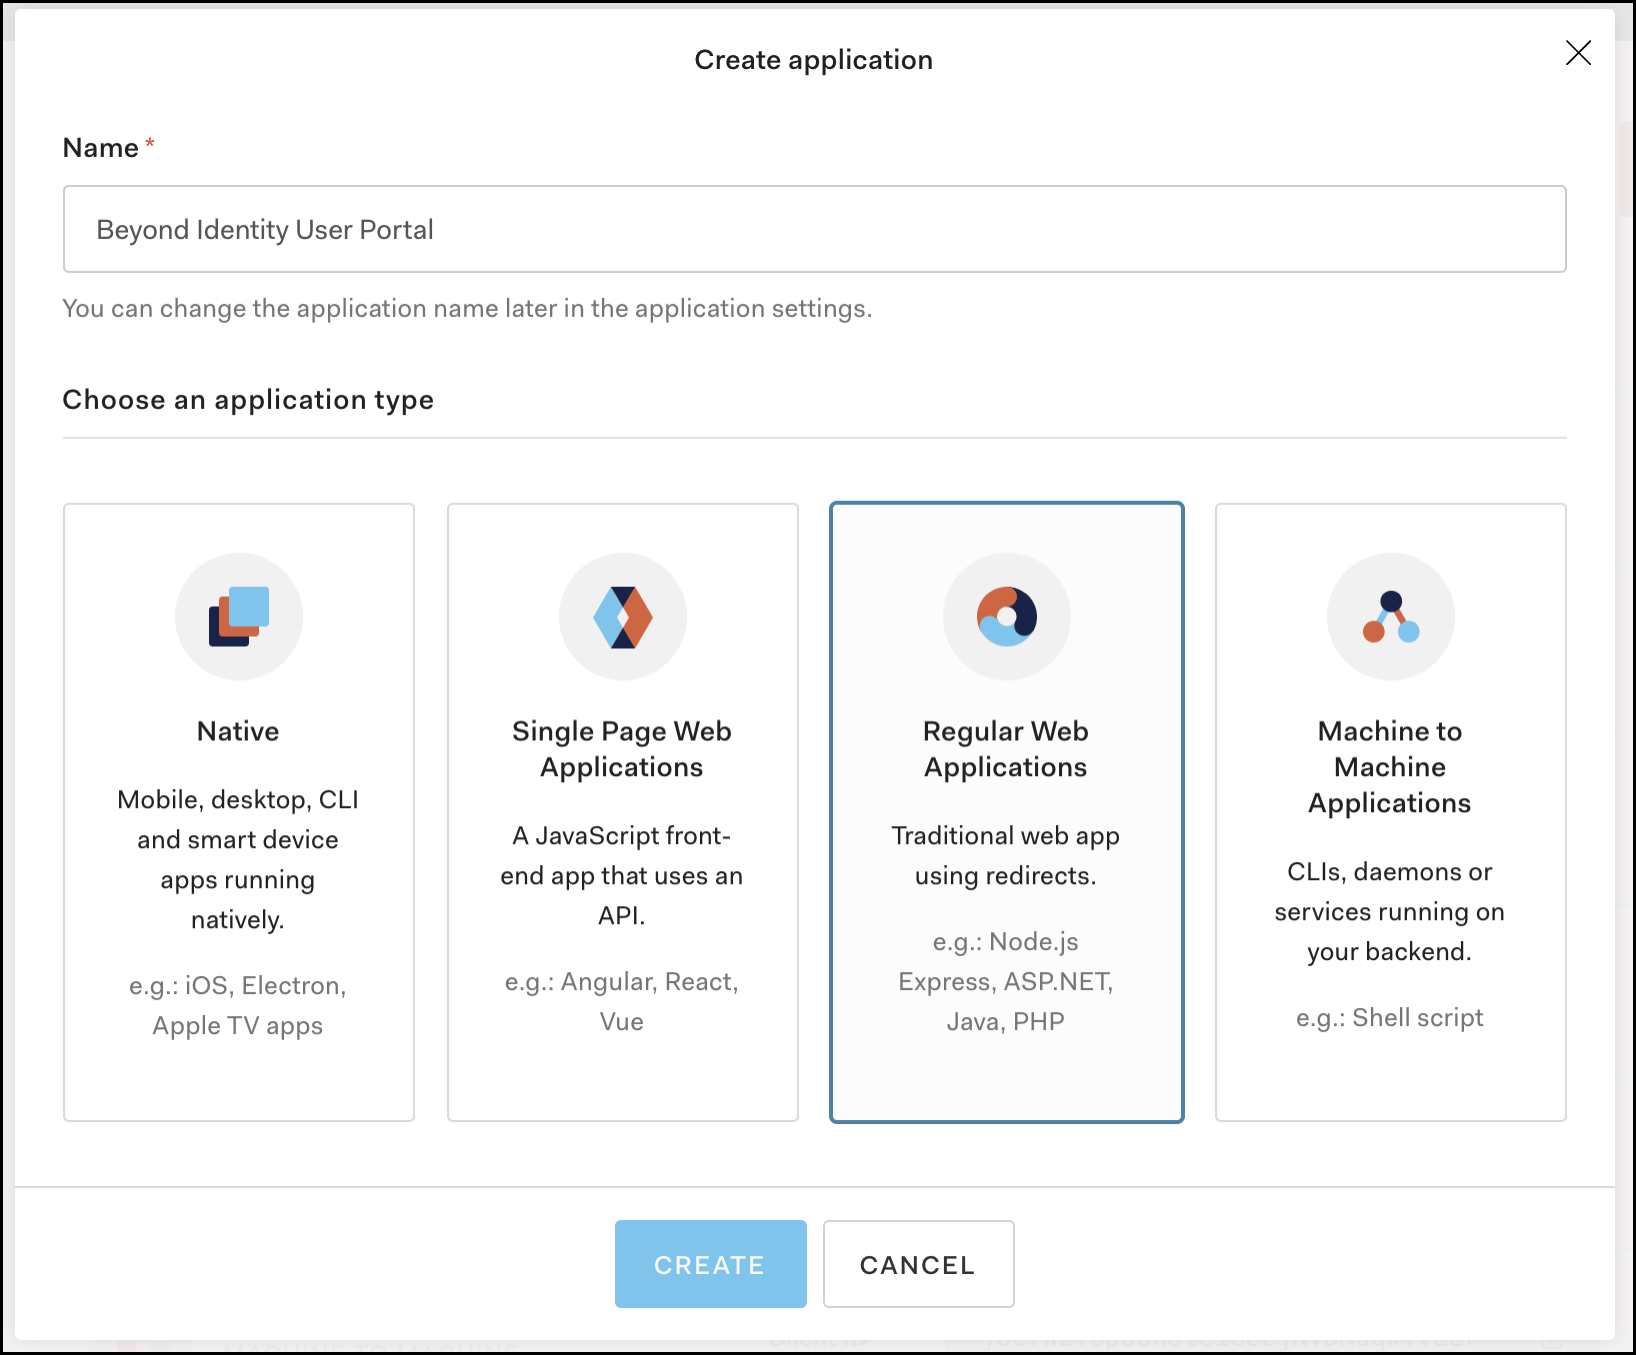
In the Settings tab, scroll down and record the Domain for your tenant and also record the Client ID and Client Secret assigned to Application. These values will be needed in the next step to configure access into the Beyond Identity User Portal.
Optional Step - Add the Beyond Identity logo to the Application Logo field. You can obtain the logo by clicking the URL below:
Scroll down again to the Application URIs section and enter the following values:
Application Login URI: https://user.byndid.com/auth-user/?org_id=<beyond-identity-tenant-name>
Allowed Callback URLs: https://user.byndid.com/auth-user/callback
Scroll down and click Save Changes - all the other settings should be left as default.
Step 4: Setup Beyond Identity User Portal Authentication
Once logged into Beyond Identity Admin console, click on Account Settings.
Click on User Portal tab and click on Edit.

Update SSO Issuer, Client Id, and Client Secret fields from the previous step.
SSO Issuer is same as Auth0 domain URL.
SSO Client ID and SSO Client Secret is collected during Step 3.3

Step 5: Setup Beyond Identity Service for User Authentication:
Once logged into Beyond Identity Admin UI, click on Integrations tab and then click on OIDC Clients.
Click on Add OIDC Client and complete the following fields:
Name = “Auth0 SSO” or similar
Redirect URL = “https://<auth0 domain>.auth0.com/login/callback” - replacing <auth0 domain> with your Auth0 domain URL or configured custom domain.
For example - https://byndid-auth0-demo.us.auth0.com/login/callback
Leave Token Signing Algorithm and Auth Method as default
Click Save Changes

Click on the newly created OIDC Client configuration and write down Client ID and Client Secret Value (see below screenshot). You will be using these values in the next step.

Step 6: Enable New Login Experience required for OIDC connections
In the Auth0 Management Dashboard, on the left hand-navigation window click Branding and then Universal Login on the expanded sub-menu.

In the Settings tab, select the New Experience.

Scroll down and click Save Changes
Step 7: Configure Beyond Identity as the Identity Provider in Auth0
On the left navigation pane click ‘Authentication’, the menu will expand, then click ‘Enterprise’
On the Enterprise Connections page - Click ‘Open ID Connect’

Then within the Open ID Connect menu click Create Connection
Enter the following values:
Connection Name: “Beyond-Identity”
Issuer URL: “https://auth.byndid.com/v2”
Client ID: From Step 5.4
Client Secret: From Step 5.4

Click Create
On the Settings tab under Issuer URL click Show Issuer Details and complete with the following values:
Beyond Identity IdP endpoint URLs: Issuer Authorization endpoint Token endpoint JWKS endpoint | https://auth.byndid.com/v2/authorize https://auth.byndid.com/v2/token |

Scroll down to Scopes and enter openid

Click Save Changes
Now scroll back up and click on the next tab along Login Experience

Under this tab, find the section called Connection button and check (enable) the checkbox field labelled Display connection as a button
Enter the button display name as Beyond Identity
Add the following url for the button logo URL - https://byndid-public-assets.s3-us-west-2.amazonaws.com/logos/beyondidentity.png

Scroll down and click Save
Step 8: Enable the Beyond Identity Connection in Auth0
Lastly, on the Applications tab within the OIDC connection - enable this connection for the Beyond Identity Admin and User portal applications which were created in Step 1 and 3.

Step 9: Check Auth0 callback URL is correct in Beyond Identity OIDC integration
In the Auth0 management dashboard, under the ‘Settings’ tab of the Beyond Identity OIDC connection just created in Step 7, make a note of the ‘Callback URL’ as below.

In Beyond Identity Admin UI, click on Integrations tab and then click on OIDC Clients. Find the OIDC client created in Step 5 and click Edit.
Ensure that the Redirect URI value matches with the value in Auth0 connection (Step 9.1). If the values do not match, update the value with the Callback URL extracted in Step 9.1 and Save Changes.

Setting up test users
User Provisioning
Before your users can start authenticating with Beyond Identity, they need to be provisioned in the Beyond Identity Directory. As Auth0 does not support SCIM, users need to manually provisioned using the Beyond Identity admin portal or using the Beyond Identity REST API. Please see admin portal video tutorial here which shows navigating to the directory area of the admin portal - https://www.beyondidentity.com/resources/beyond-identity-admin-console-overview.
In the Admin portal under the Directory tab click Add User
Enter the following values:
External ID: oidc|Beyond-Identity|<email_address>
Email: <email_address>
Username: <email_address>
Display Name: <Full Name>
Click ‘ Save Changes’
The user will now be sent a welcome email to the email address supplied above. See User Enrollment section.
Note: The External ID format above must be adhered to as this will be the user ID of the user in Auth0.
User Enrollment
Enrolled (provisioned) user will receive an email from Beyond Identity welcoming them to the new Identity Provider.
See image below for reference:

Each enrolled user will be asked to follow the two steps below:
Step 1: Download the Beyond Identity Authenticator to their device.
When the user clicks View Download Options, the Beyond Identity Authenticator downloads page will open in a browser with all supported platforms displayed. The user should download and install the Beyond Identity Authenticator on their device if they have not already.
Now that the user has the Authenticator installed on their device, they should proceed to Step 2 as there is not yet a user credential associated with the Authenticator on that device.
Step 2: Register their Credential in the Beyond Identity IdP.
By clicking on Step 2 Register New Credential, the user’s credential will get enrolled in the Beyond Identity service on the back end. On the front end, users who click Step 2 will be taken to the Beyond Identity Authenticator where they will see the progress of their credential registration. Once completed, the user will see a credentials in the Authenticator.
See example image below:

User Authentication (Signing in)
Each enrolled user can visit any application supported by the SSO to sign into corporate applications without a password.
The SSO-supported application will ask the user to enter their username.
Once the username is submitted, a prompt to use or open the Beyond Identity app for authentication will display for the user.
The user should click affirmatively on the prompt to be signed into their application, without the use of a password. The Beyond Identity app along with a success notification will display.
Note: For iOS devices, some application sign-in processes will ask the user to exit out of the Beyond Identity Authenticator to return to their app after successful authentication.
User Deprovisioning
To deprovision a user from the Beyond Identity experience, manually delete users from Beyond Identity Admin Portal.