The guide describes how to configure the Beyond Identity WS-Fed Integration. The endpoints like redirect URL, admin console access URL refer to the EU infrastructure.
There are three steps to perform the configuration:
Configure WS-Fed in Beyond Identity Admin Console
Configure Beyond Identity as a Claims Provider (performed on ADFS)
Configure Beyond Identity Admin Console and User Console as Relying Party (Optional)
Depending on clients relying party application specific requirements, the following steps may need to be performed. These are client/application specific and not covered in this document.
Configure Beyond Identity with Customer Relying Party Metadata
Configure Relying party transformation rules for each Application in ADFS.
Contents
Configure WS-Fed in the Beyond Identity Admin Console
In this section, we will cover how to add create a new WS-Fed configuration. The user must be able to access the BI admin console for example through their SSO.
In BI admin console navigate to “Integrations” and click on WS FED tab.
Click on + Add WS-Fed Configuration. In Add WS-Fed Configuration screen, enter a name and values for other fields.
SP Single Sign On URL: This is the HTTP-POST endpoint for your ADFS , for example https://adfs.beyondadfs.com/adfs/ls
SP Audience URI: This is the Entity ID for your ADFS, for example http://adfs.beyondadfs.com/adfs/services/trust
Name ID Format: unspecified
Subject User Attribute: Choose UserName from the drop-down
Authentication Context Class: Leave as it is
Under Attribute Statements (optional), add upn and email attributes as shown below. For Namespace type in http://schemas.xmlsoap.org/ws/2005/05/identity/claims
Click Save Changes. The saved configuration will show up as below
Copy the ID. The value of the ID, in this example is “0eb89752-514d-435d-bffd-e0cbc553869b”. This is used to construct the metaconfig XML URL. This XML will be used imported in creating a new ADFS claims provider. For EU, the URL is https://auth-eu.byndid.com/wsfed/v1/0eb89752-514d-435d-bffd-e0cbc553869b/FederationMetadata/2007-06/FederationMetadata.xml. Access the URL and save the XML file.
Configure Beyond Identity as a Claims Provider
In this section, we will cover how to add Beyond Identity as a Claims Provider to the customer ADFS instance.
Start Add Claims Provider Trust Wizard.
Click Start
In Select Data Source screen, select Import Data about the claims provider from a file. Browse and select the XML file saved in section 1.
Configure a display name for the Claims Provider and click Next. This name will appear on the Customer ADFS Sign On screen. In the example here, we have named it Beyond Identity (Passwordless).
Verify imported Metadata is well formatted and inspect Offered Claims. Beyond Identity relies on the User Principal Name (UPN) attribute. Once selected, click Next.
Make sure Open the Edit Claim… box is checked and click Close.
Configure which claims shall be passed through. Click Add Rule.
Select Pass Through or Filter an Incoming Claim under claim rule template drop down and click Next.
Note: this step may be different for each customer.
Name the rule something meaningful and select the claim type to pass through.
Note: Beyond Identity only supports the UPN claim type.
Click Finish.
Configure an ADFS AnchorClaim for the Beyond Identity Claims Provider. This basically configures what claim you want to pass as the subject of the WS-FED Assertion. Beyond Identity supports UPN as the claim type.
Open PowerShell as an Administrator. Issue the following commands:
Set-AdfsClaimsProviderTrust -TargetIdentifier https://auth-eu.byndid.com/wsfed/v1/0eb89752-514d-435d-bffd-e0cbc553869b -AnchorClaimType http://schemas.xmlsoap.org/ws/2005/05/identity/claims/upn
Issue the following command to confirm the correct value is set for the AnchorClaim type.
get-adfsclaimsprovidertrust | select AnchorClaimTypeRun the following command to enable ADFS IdP Initiated Sign-on. By default, it is not enabled.
Set-AdfsProperties -EnableIdPInitiatedSignonPage:$trueAppendix
Configure Admin Console / ADFS Integration (Optional)
In this section, we will configure the Beyond Identity Admin portal to delegate authentication to the customer ADFS server. We will do two things in this section:
Add Beyond Identity Admin Portal as an Application Group to customer ADFS
Configure Beyond Identity Admin Portal to use ADFS OIDC credentials
Add Beyond Identity Admin Portal (or any protected application) as an Application Group to ADFS
From the ADFS console right-click Application Groups and select Add Application Group…
Select Server Application accessing a Web API, provide a Name (Beyond Identity Admin Portal), and click Next.
Provide a Redirect URI and click Add. Also, copy the Client Identifier, this is the OIDC Client ID that is used to configure the Beyond Identity admin portal.
Redirect URI: https://admin-eu.byndid.com/auth/callback
Save the client ID.
Click Generate a shared secret. Copy this value. This value is the OIDC Client Secret used for the Beyond Identity Admin portal configuration. Click Next.
In the Configure Web API screen, enter the following Identifier and click Add. Then click Next.
Production Value: https://admin-eu.byndid.com/?org_id=<BI_Tenant_ID>
Select the permissions. Click Next This may be different depending on the setup. In this case we are giving everyone access to the Beyond Identity Admin portal, but that is not advisable in a real world scenario. Most likely access would only be permitted to an Active Directory group of Beyond Identity Admins.
Make sure the openid scope is marked. Click Next.
Review the summary and click Next.
Now click Close.
Configure the Beyond Identity Admin Portal to use ADFS OIDC credentials
Collect the Client Identifier and Client Secret that were generated in steps 3&4 under section Configure Admin Portal / ADFS Integration.
Collect Redirect URL configured in step 8 under section Configure Admin Portal / ADFS Integration.
The issuer URL can be obtained by accessing configuration URL at https://ADFS-DOMAIN-NAME/adfs.well-known/openid-configuration
Configure the User Console / ADFS Integration
In this section, we will configure the Beyond Identity User Console to delegate authentication to the customer ADFS server. We will do two things in this section:
Add Beyond Identity User Console as an Application Group to customer ADFS
Configure Beyond Identity User Console to use ADFS OIDC credentials
Add Beyond Identity User Console as an Application Group to ADFS
From the ADFS management console, right-click on Application Groups and choose Add Application Group.
In Add Application Group Wizard, provide a Name, Description and select server application accessing a web API under Client-Server applications and click Next.
Copy the client identifier. This will be used in configuring BI User Console on BI side. Type in https://user-eu.byndid.com/auth-user/callback in the Redirect URL and click add. Add a description under Description. Click Next.
In the Configure application Credentials screen, select Generate a shared secret. Click on copy to clipboard to copy the secret. This will be used in configuring BI User Console on BI side.
In the Configure Web API screen, under Identifier enter https://user-eu.byndid.com/auth-user/?org_id=<BI_Tenant_ID> and click Add. You may also add some description. Click Next.
In the Choose Access control Policy screen, select Permit everyone. Click Next.
In Configure Application Permissions, under Permitted scopes select openid. Click Next.
In the Summary screen, review summary. Click Next.
On the Finish screen, you should see the message The Application Group has been successfully created.
Configure Beyond Identity User Console to use ADFS OIDC credentials
Collect the Client Identifier and Client Secret that were generated in steps 3&4 under section Configure User Console / ADFS Integration.
Collect Redirect URL configured in step 3 under section Configure User Console / ADFS Integration.
The issuer URL can be obtained by accessing configuration URL at https://ADFS-Domain-NAME/adfs/.well-known/openid-configuration
For example https://adfs.beyondadfs.com/adfs/.well-known/openid-configuration
Verification
Admin console verification
Access https://admin-eu.bynd.com and type in the tenant-name.
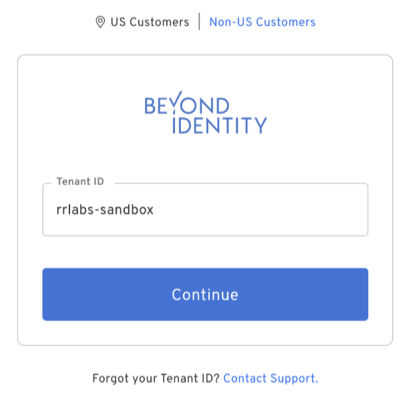
Click Continue. You should see the ADFS home realm discovery screen below.
Click on BI_Passwordless. It should launch the platform authenticator and after successful authentication you should see BI admin console dashboard.
User console verification
Access https://user-eu.byndid.com/auth-user/?org_id=YOUR_TENANT_ID,
You should see the ADFS home realm discovery screen below.
Click on BI_Passwordless. It should launch platform authenticator and after successful authentication you should see a similar screen.
Command Reference
Setting Active Directory as the only claims provider for the specific relying party
Set-AdfsRelyingPartyTrust -TargetName “RELYING_PARTY_NAME” -ClaimsProviderName @("Active Directory")
List properties of the specific relying party
Get-AdfsrelyingpartyTrust -Name “RELYING_PARTY_NAME”
Get ADFS configuration properties
Get-Adfsproperties